Over the past months, I’ve helped a few people get started in their YouTube video-recording journey, and I understand that from someone that is absolutely new to this, even the most basic concept is unknown.
So, let’s start from the beginning.
- a camera that can record video, and that accepts an external audio mic input
- a tripod, and some other stands for lights and microphone
- a microphone that can be connected to the camera
- a room, where you can be in control of light and sound (more on this later)
- lights (1 is the bear minimum, 3 is great)
- a computer powerful enough to edit video
- a video editing software
Also very useful, in case you want to write your content before reading it on screen, you should also consider:
- a teleprompter
- a teleprompter app for phone or tablet
With the above list of equipment in mind, let’s try to unpack the whole process on a step by step basis, so you can create your own YouTube studio at home and start recording your first YouTube video.
1. The room
When you choose a room for your YouTube video production, make sure that it’s not near a source of noise. Sound is important during video recording, and if you’re continuously interrupted by someone, or something making loud noise that can tamper with the recording, making YouTube videos can easily become a frustrating process.
Also important, clap your hands while standing or sitting in the position where you think you’ll be recording your videos. If the sound of your clap is dry, without much reverb, then you’re good. If on the other hand, your find that the room is too reverberated, then you will need to bring some changes, like sound blankets, acousting foam panels, or simply by stuffing the room with furniture.
The light is also very important. I suggest blocking natural light completely by placing black thick blankets all over the windows. I explain this important topic in detail in this other post if you need more info. Basically, once natural light is completely blocked, you’re in control of the lighting and you will achieve more consistent results.
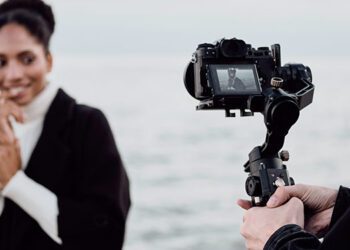
2. Choosing the camera and framing
I suggest using a camera that can at least record video in 1080p. Or you can go for a newer model with 4k recording capabilities. Aside from that, let’s have a look at the important features to look for in a camera for YouTube videos:
- Audio input: usually a mini-jack 3.5mm input that accepts external microphones
- Selfie screen: if you’re doing this alone, you want to be able to flip the camera monitor
- HDMI output: can be useful, in case you want to connect an external monitor while recording
- Lens: there is no right or wrong here, I suggest starting off with the basic lens that comes with your camera
- Video mode with manual exposure: choose a camera that allows recording video while manually choosing aperture, ISO, shutter speed and white balance
Let’s now take a look at what to do with the camera in order to setup your YouTube studio.
- Place the camera on a tripod, turn it on, and take a look at the framing
- Adjust the framing to your liking, this is where you decide what’s in your video (your background and visual setup)
- Once you’re happy with the framing, do not move the camera and start working on the lighting.
3. Lights setup
Now that the camera is in position, you can bring in the lights. You should choose the strongest (brightest) light as your main key light, the one that will be used to illuminate yourself.
If you have more than one light available, a second light should be used to light the background, and the third light should be positioned behind you, pointed at you, to illuminate your back (this light is called the “hair light”). Whether you want these two lights to be in frame (visible by the camera) or not, it’s your artistic choice.
If you want to create some interesting and modern looks, you can also consider using RGB lights for color.
4. Camera and lights settings
This is the part where you need to understand a few photography concepts. I will try and make it simple, but you might need to play around with some settings that you don’t entirely understand.
Let’s start with the camera settings. This is what I recommend doing to start off:
- Set the camera to video mode and choose “manual exposure”
- Set the shutter speed to 1/50
- Set the aperture to the lowest possible setting, like f1.8, f2.8, f4 (the lower the number, the brightest the image will be)
- Set the white balance to the same temperature as your key light (take a look at the key light temperature, it’s usually around 5500 Kelvin)
- Set the focus to “manual” and adjust the focus point (put a chair where you will be sitting/standing, and make sure the chair is in focus)
- Set the ISO to the lowest possible number, like 100.
Now take a look at the image on the screen, from there you will need to make some adjustments based on your setup.
For example, if the key light is too bright, and the background is too dark, you can turn the key light down to achieve better balance. If you think the image is too yellowish, you can adjust the white balance. If the whole image is too dark, and you’ve already maxed out both the lights and the camera aperture, increase the ISO from 100 to 400-500.
Once you’re happy with the result, note down all the settings for both camera and lights, and take pictures of the setup.
5. Audio
The closer the microphone is to your mouth, the better you will sound. It’s that simple. Do not record audio from the camera built-in microphone, I suggest investing in an external microphone and a mic stand, or in a lapel mic, so you can record better YouTube videos and sound more professional.
If you’re choosing to go for an external boom microphone, you can place it on a stand near you, potentially from above or from the bottom. Your choice if you prefer to include the mic in the frame or not, but if you choose not to include the mic in the frame, make sure it’s as close as possible, and pointed to your mouth.
You will need a long cable to connect the microphone to the camera. Once the connection is established, navigate to the sound menu of your camera, speak at a normal volume and adjust the input volume to make sure that the signal is not too high, nor too low.
If your camera allows you to connect headphones, you can monitor the quality of the audio while you’re testing. Otherwise, do a test recording and listen to it from a computer.
6. Computer and editing software
Chances are you already have editing software inside your computer. If you are one a Mac, iMovie is included with your iOS, and if you’re on a PC, you have Windows Video Editor. I suggest starting from there, and test some footage to see if your computer can handle it.
Based on your experience and type of computer, you can then decide to upgrade to a more professional video editing software.
If you want to go with free software, I can suggest taking a look at Shotcut and DaVinci Resolve, the first is an open source software, the second is a professional software made by Blackmagic Design.
If you prefer to pay for a professional software, there’s Premiere Pro (for mac and windows), and Final Cut (only for mac)
Most of these softwares have clear information on their website regarding the minimum hardware requirements for running. I suggest taking a look, especially before purchasing any software, to make sure your computer can run these software.
7. Time to record!
Everything is set and ready to go, it’s now time to record your first YouTube video! But how??
Well… the content that you’re about to record is the most important element of your YouTube production effort, so I highly recommend planning, scripting, or at least jotting down a list of the topics.
In my personal experience, a teleprompter and a script can be a life and time saver, it can help you focus on your delivery, rather than the content itself, and will make the process much easier, especially if you’re new to this.
If you use a teleprompter, make sure this is not obscuring the lens or any part of your image, and I also suggest purchasing a dedicated teleprompter app so you can place your phone or tablet on the teleprompter and read your script while this is scrolling up.
8. Incremental improvements
Watch ANY YouTube channel’s first and last video, and you will see a dramatic change in quality. The same will happen with your YouTube channel. As you record multiple videos and go through the process again and again, you will get better with your setup, with your confidence, your content, and you also might want to purchase new equipment to improve audio/video quality.